
Clogged exhaust fans can be a significant nuisance, causing poor air circulation, increased humidity, and potential damage to your home. Whether it’s in your bathroom or kitchen, understanding how to clean a clogged exhaust fan is essential for maintaining a healthy living environment. This guide will walk you through the process, ensuring your exhaust fan operates efficiently and effectively.
Understanding Clogged Exhaust Fans
What Causes Clogs in Exhaust Fans?
Exhaust fans can become clogged due to the accumulation of dust, dirt, grease, and other debris. Over time, these particles build up on the fan blades, motor, and ductwork, reducing the fan’s efficiency and potentially causing it to overheat or malfunction.
- Dust and Dirt: These are the most common culprits, especially in areas with high foot traffic.
- Grease and Grime: In kitchen exhaust fans, grease from cooking can accumulate and harden.
- Moisture and Mold: In bathroom fans, high humidity can lead to mold growth, further blocking airflow.
How to Identify a Clogged Exhaust Fan
Recognizing the signs of a clogged exhaust fan can prevent further damage and ensure timely maintenance.
- Reduced Airflow: If the fan isn’t moving air as effectively as before, it’s likely clogged.
- Unusual Noises: Grinding or rattling sounds may indicate debris obstructing the fan blades.
- Overheating: A clogged fan can overheat, posing a fire hazard.
- Persistent Odors: Lingering smells suggest the fan isn’t ventilating properly.
Tools and Materials Needed
Before you begin, it’s important to gather all the necessary tools and materials. Having everything on hand will streamline the process and prevent any mid-task interruptions.
Basic Tools for Fan Cleaning
- Screwdriver: Necessary for removing the fan cover and any internal components.
- Cordless Drill (Optional): For faster screw removal.
- Vacuum Cleaner: Equipped with brush and crevice attachments to effectively remove dust and debris.
- Compressed Air Canister: Helps blow out dust from hard-to-reach areas.
Essential Cleaning Supplies
- Dish Soap: Mild soap for cleaning the fan cover and non-electrical parts.
- Microfiber Cloths: Soft, lint-free cloths for wiping down fan blades, housing, and motor components.
- Soft Bristle Brush: A toothbrush or similar brush is ideal for scrubbing delicate parts.
- Damp Cloth: For wiping down surfaces without leaving moisture behind.
- Protective Gear: Eye protection and a face mask to avoid dust inhalation.
Safety Precautions
Safety should always be your first priority when working with electrical appliances. Improper cleaning practices can lead to electrical shocks or damage to your exhaust fan.
Turning Off the Power Supply
- Locate the Circuit Breaker: Find the circuit breaker that controls the power supply to your exhaust fan. Turn it off to prevent any electrical accidents.
- Double-Check: Ensure the power is off by trying to turn on the fan. If it doesn’t start, you’re good to go.
Wearing Protective Gear
- Eye Protection: Wear goggles to protect your eyes from falling dust or debris.
- Face Mask: Prevent inhaling dust particles, especially if the fan hasn’t been cleaned in a long time.
Step-by-Step Cleaning Process
With the tools and safety measures in place, you’re ready to start cleaning. Follow these detailed steps to ensure that every part of your exhaust system is thoroughly cleaned.
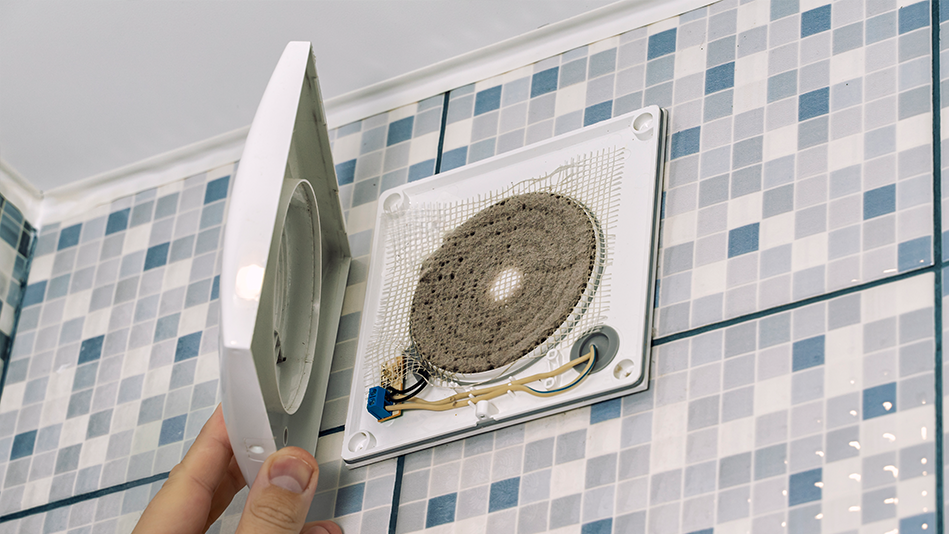
Step 1: Remove the Exhaust Fan Cover
Detaching the Fan Cover
- Unscrew or Unclip the Cover: Depending on your fan model, the cover might be attached with screws or clips. Carefully remove these and set them aside.
- Handling Covers with Lights: If your cover has an integrated light, disconnect the wiring before fully removing the cover.
Cleaning the Cover
- Submerge in Soapy Water: For non-light covers, fill your sink with warm water and add a few drops of dish soap. Soak the cover, then scrub it with a soft brush to remove built-up dirt.
- Drying the Cover: Place the cleaned cover on a towel and allow it to air dry completely before reattaching it.
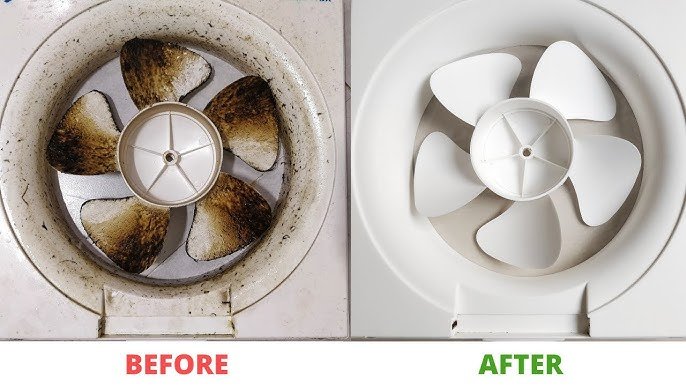
Step 2: Vacuum the Fan and Housing
Initial Dust Removal
- Vacuum the Fan Blades: Using a brush attachment, gently vacuum the fan blades to remove dust. Avoid applying too much pressure to prevent bending the blades.
- Clean the Fan Housing: Switch to the crevice attachment to vacuum the fan housing and any hard-to-reach areas.
Deeper Cleaning of the Motor
- Compressed Air for Fine Dust: Use compressed air to blow out any remaining dust from the motor and other intricate parts of the fan.
- Wipe Down with a Damp Cloth: Finish by wiping down the motor and housing with a damp microfiber cloth to remove any lingering dirt.
Step 3: Deep Clean the Fan Motor (Optional)
Removing the Fan Motor
- Unscrew the Motor: If your fan is particularly dirty, you might need to remove the motor for a deeper clean. Carefully unscrew the motor from the housing, holding it securely as you detach it.
- Clean with Compressed Air and a Brush: Use compressed air to remove dust from the motor and blades, followed by a gentle scrub with a soft brush.
Cleaning the Fan Housing
Vacuum and Wipe Down: With the motor removed, vacuum and wipe down the entire housing, ensuring that all dust and dirt are removed.
Step 4: Clean the Exhaust Port and Duct
Inspecting the Exhaust Port
- Check for Blockages: Examine the exhaust port for any visible blockages that might be restricting airflow. Use a vacuum or brush to clear out any debris.
- Ensure the Damper Moves Freely: The damper should open and close smoothly. If it’s stuck, clean it thoroughly to restore proper function.
Cleaning the Duct
- Vacuum the Duct: If accessible, use the vacuum to clean the duct leading from the fan to the exterior of your home.
- Compressed Air for Hard-to-Reach Areas: For areas you can’t reach, use compressed air to blow out dust and debris.
Step 5: Reassemble the Exhaust Fan
Motor Reinstallation
- Reattach the Motor: Carefully place the motor back into the housing and secure it with screws.
- Reconnect Any Wiring: If your fan has a light, ensure the wiring is properly reconnected.
Reattaching the Fan Cover
Snap or Screw the Cover in Place: Align the cover with the housing and secure it, either by snapping it into place or screwing it back on.
Step 6: Test the Fan
Restore Power
- Turn the Circuit Breaker Back On: Restore power to the fan by turning the circuit breaker back on.
- Test the Fan’s Operation: Turn on the fan to ensure it operates smoothly, without any noise or reduced airflow.
Final Inspection
Check for Any Issues: Listen for unusual vibrations or noises, and ensure that the airflow has improved.
Maintenance Tips
Regular maintenance is key to keeping your exhaust fan in top working condition. Here are some tips to help you maintain your fan and prevent future clogs.
Regular Cleaning Schedule
Every 6 Months: Make it a habit to clean your exhaust fan at least twice a year to prevent dust buildup and ensure optimal performance.
Preventive Measures
- Install Filters: Consider installing filters over your vent covers to trap dust before it enters the fan.
- Upgrade to Low-Maintenance Fans: If your fan requires frequent cleaning, consider upgrading to a model that’s designed for easy maintenance.
Common Issues and Troubleshooting
Even after cleaning, you might encounter issues with your exhaust fan. Here’s how to troubleshoot common problems.
Weak Airflow
Check for Remaining Blockages: If the airflow is still weak, there may be an obstruction in the duct. Check the duct thoroughly or consult a professional if necessary.
Persistent Noises
Inspect for Loose Parts: If the fan is making noise, check to see if any parts are loose. Tighten any screws and ensure that the fan is properly aligned.
When to Call a Professional
Complex Issues: If the fan still doesn’t work properly after cleaning, it might be time to call in a professional. This is especially important if you suspect an issue with the fan’s electrical components or if the ductwork is inaccessible.
Conclusion
Regular maintenance of your exhaust fan not only improves its efficiency but also extends its lifespan. By following this comprehensive guide, you’ll ensure that your bathroom exhaust fans or kitchen fans continue to function at their best, keeping your home comfortable and well-ventilated. Remember, if you encounter any issues beyond basic cleaning, don’t hesitate to consult a professional to avoid any long-term damage to your system.
Frequently Asked Questions
How often should I clean my exhaust fan to prevent clogs?
It’s recommended to clean your exhaust fan at least once every six months. However, if your fan is in a high-use area like a kitchen or bathroom, more frequent cleaning every three months may be necessary to prevent clogs and ensure optimal performance.
Can I use compressed air to clean my exhaust fan?
Yes, compressed air can be a useful tool to dislodge dust and debris from hard-to-reach areas within the exhaust fan, such as the motor or ductwork. However, it should be used cautiously to avoid damaging delicate components or spreading dust throughout the room.
What should I do if my exhaust fan still doesn’t work after cleaning?
If your exhaust fan remains non-functional after a thorough cleaning, it may have a more serious issue such as a faulty motor, electrical problem, or broken parts. In this case, it’s advisable to consult a professional electrician to diagnose and repair the problem.
Is it safe to clean the exhaust fan by myself, or should I hire a professional?
Cleaning an exhaust fan is generally safe to do on your own if you follow proper safety procedures, such as turning off the power and using the right tools. However, if you’re uncomfortable with the process or if the fan is particularly difficult to access, hiring a professional is a good option to ensure the job is done safely and effectively.
Can a clogged exhaust fan affect my energy bills?
Yes, a clogged exhaust fan can cause the motor to work harder, leading to increased energy consumption. Over time, this can result in higher energy bills. Regular cleaning helps maintain the fan’s efficiency, reducing energy usage and potentially lowering your utility costs.